
Real Estate Photography
It’s been proven that going with a professional real estate photographer helps sell more listings. If you are looking to hire or shoot better Real Estate Photography hire professional real estate photographer Sally Ullman. Her expert photography services will highlight how to shoot Real Estate photography as well as how to develop a critical eye for distractions that lead to poor quality photographs.
Whether you are an agent that takes your own photos, looking to hire a professional real estate photographer or you are learning how to be a real estate photographer; there are critical overviews that will help you take better photos or hire a discerning professional photographer.
General Real Estate Photography Tips and Guidelines
These tips and guidelines for taking pictures of real estate for sale will help you when selling or leasing, homes, condos, commercial, and rentals property. It will also help you enhance pictures of both the interior and exterior of real estate property.
Reviewing light, and planning to take photographs of real estate during various times of the day should always be taken into consideration. Also, common problems that occur in many real estate photography situations and how to overcome them photographically. Such as:
- Advertising / Misrepresentation
- Acceptable / Unacceptable changes
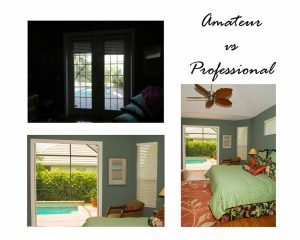
- Agent vs. Professional Photographer
- Technique / Equipment is part of the solution
- Creative Angles and Lighting
When performing real estate photography you should consider how the photos are going to be used. They are basically advertisements used to sell a property. There is little room to misrepresent what you are photographing; however, misrepresentation does occur which tends to turn off prospective buyers…
Pictures for Your Cell Phone vs. Professional Real Estate Photographer
Techniques, including creative angles, equipment, lighting, and postproduction in photoshop used by real estate photographers all factor into better results. Unless you have a program that you can use to edit photographs, it may be difficult at times to take a good picture.
Depending on the value of the property, consider the lead photograph to be like an advertisement to sell it! Some agents feel only the selling price dictates hiring a professional real estate photographer. If the property is small or not selling for much money, often the agent will take their own photos. As a professional photographer, you always have more to offer an agent and some of the following photos will illustrate that.
General Guidelines For Real Estate Photography
- Agents must represent the property correctly for legal reasons.
- Buyer- ask questions and look at the property in person or send a representative- if you buy or sell sight unseen you must justify if corrections were made photographically.
- What are some common problems we find on MLS?
- What are the changes we can make to those rooms and photographs later that are acceptable versus a misrepresentation of the room?
- Look at these photos that were taken directly from MLS listings and spot all the problems.


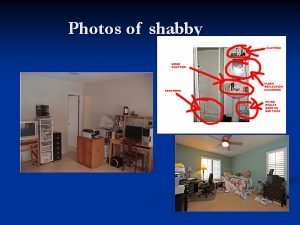
These interior real estate photographs illustrate that distractions were not taken care of in advance. Improper lighting, the perspective of camera angle and a general room declutter would have helped.
Next, we will look at how an exterior photograph can be improved from the original to the retouched final and what is acceptable or not in illustrating the property.
Misrepresentation vs. Acceptable Changes in Post-production
Acceptable Post Production Changes
- Sky enhancements
- Water enhancements
- Lighting adding to rooms
- Adding more color to outdoor landscaping
- PRO- get a release if your images are modified later or sign off on their use if altered beyond what you believe is creditable
Unacceptable Pot Production Changes
- Removal of a building
- Extreme wide-angle use to make space look larger.
- Changing something with permanence such as power lines/poles/neighbors
- Do not over enhance images.
Basics in Real Estate Photography – Location
- Observe the most flattering angle
- Hold the camera straight-keep doorways as parallel as possible
- Tripod if you can’t hold camera steady or use self-timer and step away
- Alternative angles -bend down or stand on a ladder
- Lighting-adjust and turn on room lights- balance with daylight
- An overcast day can be beautiful don’t dismiss this light
- Sharp focus always (everything in the room is in focus)
Agent choice of Camera is usually a point-and-shoot camera or even a cell phone but they both lead to problems with lighting.
- They narrow the fields of vision or over-exaggerate it
- Accuracy is best.
- They underexpose areas and overexpose others because the metering is different from pros knowledge
- These cameras do not show details as well.
- Often the color is not correct, and the agent has no idea how to correct it
Amateur vs Professional Photographer
Equipment differences-Lighting-external flash vs. camera flash vs. additional lightboxes and remote flash
- Lenses interchangeable vs. point/shoot
- Angles-vary low/tripod /height
- Color correction/white balance/mix lighting
- Retouch/cropping/time of day /the Magic hour of twilight photography
- Focus sharp
- Metering mid-tone/vary exposure
- Turn on all the lights and know how to balance.
Common Problems and Solutions in Real Estate Photography:
- Too Dark inside
- Small room
- Camera angle perspective
- Shabby condition
- Staging-would this help improve the room
- Ugly view outside
The room is too dark
- Light is usually awful
- Daylight fool’s camera meter mixed sources of light (white balance)
- Color correction
- Buyers like bright rooms
- Don’t meter on windows find a mid-section of the room to meter
- Do not use dark furniture, white walls, or windows to decide exposure

Solutions to Real Estate Photography
If a room looks too small – Use wide-angle lenses (keep it framed and scaled accurately)
only use in tight spaces. Select angle and height 1 does not fit all. If the room is too small consider using a wide-angle lens but do not exaggerate. Always shoot into the corner of a small room. Consider removing some furniture.
If a room looks shabby – get rid of the clutter in advance Hire a home stager or bring your own items to improve it, such as flowers, art, or throw rugs. Move furniture around, clean, and make sure to straighten out lamps, curtains, bedspreads, etc…
Staging experts are well worth their money. Hire a professional stager to make the space more inviting in the photo.
Be aware of what the view is. If it’s ugly –here’s a case where you should overexpose the window light
shade it- use a sheer curtain. If the outside view is not great from all windows, highlight the view that is stronger and shows that angle in your photograph
Benefits of Hiring a Professional Real Estate Photographer
A professional real estate photographer will deliver a better product than an agent. Agents lack photographic experience and their time is a factor, so hiring a professional photographer is best.
Professional real estate photographers have experience with lighting, balance, lens, and angle selection. In addition, professional photographers know the correct time of day to photograph interior and exterior real estate photography. Photography is an investment that will accelerate a house selling faster.
Please contact Sally Ullman photography for advice on all subjects of photography
CLICK HERE to view Sally Ullman Photography Real Estate Photography Gallery
Photos courtesy of:
Sally Ullman Photography
Lisa Pak Interior Design
Detlev von Kessel
MLS
Thank you,
Sally Ullman Photography